How to Connect a Brother Printer to a Mac? [3 Quick Methods]
Want to learn how to connect a Brother printer to a Mac? Initially, when I connected my Brother printer to my Mac, I spent a lot of hours. Once I learned the whole process, I observed it was too easy. Since then, I have decided to write this blog. So that no one wastes their time like I did the first time.
Besides, there are
various methods to connect your printer, such as wired and wireless networks.
Plus, you can connect it using the CD-ROM. In this blog, I will walk you
through all 3 easy methods that I have personally tried to connect my Brother
printer to my Mac.
The whole process is
simple, so you don’t have to worry too much about it. You just have to complete
each step and not skip any of them.
How
to Connect a Brother Printer to a Mac Using a CD-ROM?
While unboxing your
Brother printer, you might have received the CD-ROM. The purpose of this CD is
to install the printer. Below, I am providing a few steps to connect the
Brother printer using CD-ROM.
- First, you will need to power on your printer by plugging its power cable into a power
socket.
- After that, take your CD and insert it into the CD
drive.
- You have to follow the instructions given on the
screen. Using this instruction, you can easily install the printer driver
on your Mac.
- Further, select the printer and then install the paper
port.
- After installing the paper port, navigate to your Apple menu and click on System Preferences.
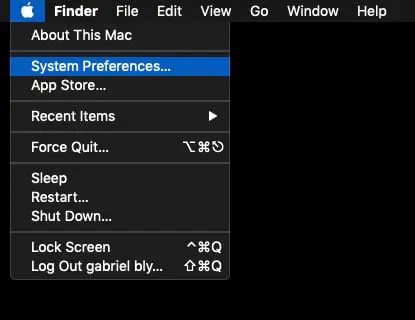
Alt Text: On the Apple menu, select the System Preference
option.
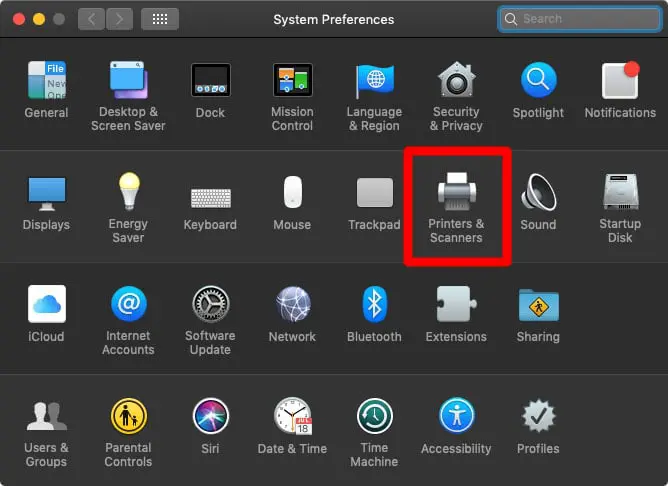
- Now, hit the
Printers & Scanners and select the Add button.

Alt Text: Select the Printers & Scanners option on a
Mac computer.
- Afterward, select the printer name and then hit the Add button.

Alt Text: Click on the + icon under the Printers &
Scanners window screen.
- Here, your printer is finally connected to your Mac
computer.
Note: Note down the SSID and Network security key
credentials before connecting the Brother printer to the Mac.
How
to Connect a Brother Printer to a Mac via USB?
The USB method to
connect a Brother printer to your Mac is the easiest method I have ever tried.
Although I have to maintain this clumsy wire, the process requires me to plug
the USB and start printing anything.
Let’s understand the
process in detail by following the step-by-step instructions described below:
- First, take one end of the USB cable, insert it into
your printer, and then insert the other end into the Mac’s port.
Note: Do not use a USB hub to connect the USB
cable; you must directly connect the cable to your printer and Mac port.
- Now, you
have to turn on the printer and the Mac computer.
- After turning on the devices, your Mac system will
automatically start the driver installation.
- Then, confirm the installation by navigating to System Preferences.

Alt Text: On the Apple menu, select the System Preference
option on a Mac computer.
- In the next step, select the Printers & Scanners option.
Alt Text: Select the Printers & Scanners option on a
Mac computer.
- Finally, you have to check the device list from the Printers section.
How
to Connect a Brother Printer to a Mac Wirelessly?
Before you connect your
Brother printer to your Mac, ensure you have downloaded the printer driver on
your Mac. This printer software is available on the Brother’s official website.
Afterward, you can go with the following steps:
- First, you need to check the WPS button on your Wi-Fi router.
- Then, place the router and printer within a range so
that they can connect easily.
- Now, press the
WPS button on the Wi-Fi router.
- After that, press and hold the Wi-Fi button for five seconds on your Brother printer.
- Then, you will notice the wireless indicator
flashing in blue.
- After connecting the printer to your Wi-Fi, you need
to switch on your Mac computer.
- On your Mac, go to the Apple menu and then select System Preferences.
- Afterward, you have to click on the Printers and Scanners.
- Next, hit the +
icon and select the Add button.
- Now, your Mac will start searching for the nearby
devices.
- Once you can find the printer in the list, select it
to connect to your Mac.
Final
Words
In a nutshell, the blog
explores how to connect a Brother
printer to a Mac using three different methods. The first method is to
connect the printer using the CD-ROM, which comes with a new Brother printer.
However, in the second method, we can connect using the USB cable. Connecting
via USB is the easiest and simplest method because it is less complex than the
wireless method. Last but not least, the last method discusses how to connect Brother printer to Mac
wirelessly.
FAQs
Question
1: Why is my Brother printer not connecting to Mac?
Answer:
There are many reasons why your printer is not connecting to your Mac computer.
You can read the following instructions to ensure everything is normal:
- Firstly, check whether your printer is properly
switched on.
- Ensure your printer and Mac are connected to the
same Wi-Fi network.
- Another reason is if someone else is sharing it,
then the user might have stopped sharing it.
Check all the above
points to check whether the problem is resolved!
Question
2: Why is my Mac not detecting my Brother printer?
Answer: If
your Mac computer is not detecting your printer, then your printer may be
turned off. Otherwise, you can check your Mac to confirm whether it is
connected to a different network or the same network. In addition, if another
user shares the printer, then your Mac will not detect your printer.
Question
3: How can I add my Brother printer to my Mac Ventura Printer list?
Answer: Below,
I have described the steps to add the printer to your Mac Ventura:
- Switch on the Mac computer and go to the Apple Menu.
- Then, click on System
Settings.
- Select the Printers
& Scanners located in the sidebar. You can scroll down to find the
option.
- Now, hit the Add
Printer, Scanner, or Fax button located on the right side.
- After that, hit the Default button.
- Further, you need to choose the printer from the
printers list and then hit Add.

Comments
Post a Comment