How to Add Brother Printer to Mac Laptop? [A Complete Guide]
Have you just bought a new Brother printer but don’t know how to add it to your Mac laptop? Well, we’ve got you covered! Brother printers are designed to connect to both Windows and Mac computers. However, this blog will mainly focus on how to add Brother printer to Mac laptop. Plus, you can connect the printer via Wi-Fi and USB, and we will discuss both of them separately.
Besides, compatibility is the biggest concern for printer users. They want to know whether their computer will be compatible with this particular printer or not. To help you with that, we have explained the compatibility of your Brother printer with macOS. Please read them carefully to find out the compatibility of your printer and computer.
Let’s start the blog
with the compatibility, and then we will move to connect the Brother printer to
Mac using a Wi-Fi network and USB cable.
Compatibility
of Brother Printer With macOS
Before you add the printer to your Mac laptop, you must know the compatibility of your devices. However, you will be glad to know that almost all types of Brother printers are compatible with macOS. So, you don’t have to worry about how to add Brother printer to Mac laptop.
Moreover, Brother provides compatible printer drivers on its official website. So, whatever printing task you want to perform, your Brother printer will harmoniously work with your Mac laptop.
In contrast to compatibility, almost all Brother printer’s features are supported on macOS. However, you need to install additional software to access some advanced features, such as duplex printing or automatic document feeders.
In short, compatibility
is not a big deal when it comes to connecting your Brother printer to your Mac
laptop.
How
to Add Brother Printer to Mac Laptop via Wi-Fi?
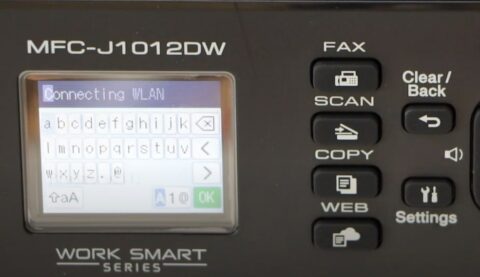
Now, we will learn how to connect Brother printer to Mac wirelessly. Ensure your printer and laptop are set up to the same Wi-Fi network. So that there will be seamless communication between your devices.
Once you have ensured this, you can move to the further steps below:
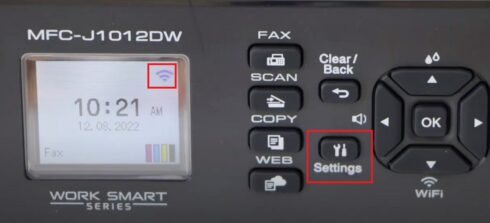
- First, turn on the Brother printer and press the Settings button on the Control Panel.

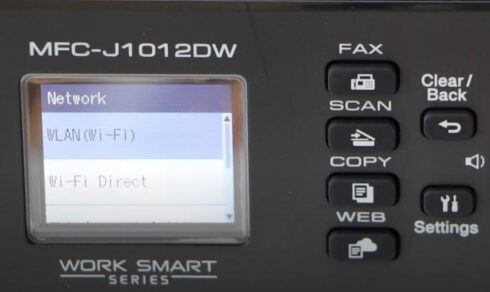
- Then, use the down
arrow and go to search for Network
> Wi-Fi by clicking on the OK
button.

- You must navigate to other steps of selecting Setup Wizard after following the
previous step.
- Here, you will need to select the option Find Wi-Fi Network.
- After that, your system will start searching for
available networks.
- Then, choose the Wi-Fi network to connect. For this,
press OK and enter the Password.

- Finally, you will find the Wi-Fi icon on your printer’s screen, showing that it is connected to the Wi-Fi network.
Now, you understand how to add Brother printer to Mac laptop via a Wi-Fi network. Now, let’s move to connect your Brother printer to a Mac using USB.
How
to Add a Brother Printer to Your Mac via a USB Cable?
Sometimes, wireless connection can be tricky. Hence, if you want to get rid of those lengthy steps, then you can try connecting your Brother printer using your USB only. For this, you must have a USB cable. You can easily get it from electronics or online retailers.
Once you are ready, follow the steps below:
- Take the USB cable and connect one end to your
Brother printer’s USB port and another end to your Mac laptop.
- Now, you have set up the physical connection between
your computer and printer.
- Here, your Mac will automatically find the new
connected device.
- Then, it will prompt you to install the printer
driver.
- Finally, you need to follow the self-explanatory instructions on your computer to set up your device.
Final
Words
In short, we discussed how to add Brother printer to Mac laptop. To connect the printer to the Mac, we followed two methods, i.e., Wi-Fi network and USB. However, the USB method is straightforward for everyone. Besides, the write-up explores the compatibility of the Brother printer. However, there are no specific compatibility requirements to connect with Mac. It is because Brother provides compatible drivers that support the Mac computer.
FAQs
Question
1: How do I connect Brother printer to my Mac laptop?
Answer: In order to add your Brother printer to a Mac laptop, try the following steps:
- Navigate to the
Printers and Scanners option.
- Then, you will need to click on the + icon (find below the printer
list).
- After that, you have to select the machine from the
list.
- Then, you must select the CUPS driver under the Use
or Print Using list.
- Next, hit the
Add button.
- Finally, click the Apple, then hit the option Quit System Preferences.
Question
2: How to connect Brother printer to computer?
Answer: If
you want to connect your Brother printer directly to your computer (Windows or
Mac computer), then you should connect it via USB cable. The USB method to add
your Brother printer to your computer is the easiest method. Moreover, the
process is more complex than the wireless one. To connect it, you insert one
end of the USB cable into your computer and another one into the Brother
printer. After that, turn on the printer and computer.
Question
3: Why is my laptop unable to find my Brother printer?
Answer: If
the issue persists, then you should try checking your Network. Make sure your
printer and computer are connected to the same Wi-Fi network. Despite this, you
can also try turning it on and off the printer. Try these two methods and check
whether they resolve the issues.
Read more: brother printer setup

Comments
Post a Comment